Info! A Photos component is needed first. Add that now.
How to insert an image:
- From within the Client Area, beneath the tools icon, choose “Edit your website content”.

- In the left column under “Public” or “Members”, choose the desired component.
- Within the content area:
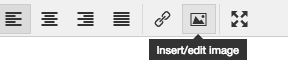
- Select “Insert” at the top of the tool bar. Then from the dropdown choose “Insert/Edit Image”. OR
- Select the “Insert/Edit Image” icon.
- Select the folder with the magnifying glass next to the “Source” field and choose the image. Photos need to already be uploaded to your “Photos” component. To do that follow these instructions.
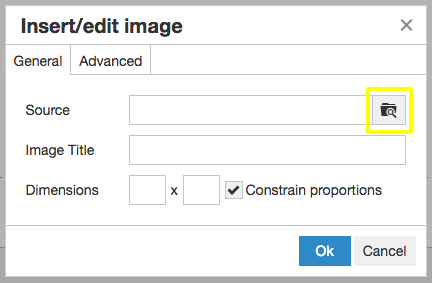
- Add an “Image Title” (ie: youth sports ages 5-18 in Hometown, State) to improve your Google, Bing, Yahoo, etc search engine rankings. Check out our Purpose Driven Content articles to help better market your website.
- Change the image dimensions if necessary.
- Under the “Advanced” tab, you can add a border.
- After pressing “Ok”, the image will appear in the content area.
- Change the justification to left, center, or right by selecting the appropriate icon.

- Save once finished.
You have successfully inserted an image. Congratulations!